A Deep Dive into the 7.3L Godzilla with Bob Folkestad
For those who do not know who do not know me, I have spent most of my life working on various projects for other companies in the transportation and agricultural industries. I have worked on about everything electrical / mechanical from professional Racecars to corn planters.
My company Creative Werks Inc., is a small boutique design, engineering, and manufacturing firm in Des Moines, IA. We have CNC’s, harness making capability, a full-on electronics lab and produce many circuit boards and controllers per year. We also have a 3500 SQFT automotive research shop with welding, fabrication, and more tools than most know how to use. (This is my hobby shop).
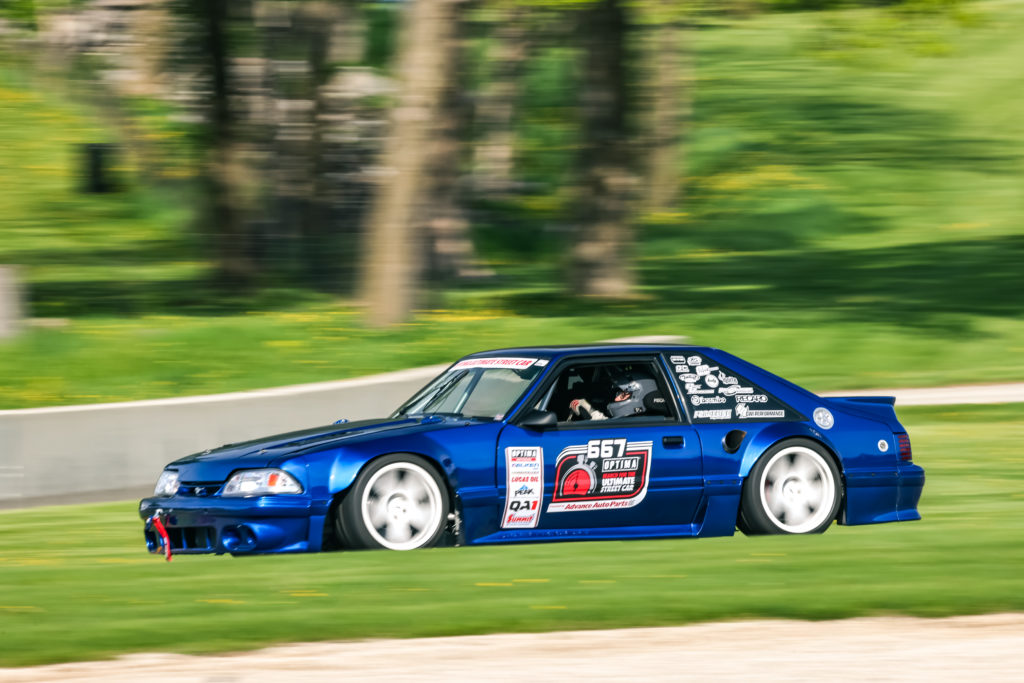
I am writing about my story of the Ford 7.3L Godzilla engine and how I became involved in the project, along with other people, and companies I have worked with. With that, some of the successes and failures along the way. This leads into building a car called “Foxzilla” we built to test these engines in a real-world environment. I am not endorsing any companies and am trying to be as unbiased as possible, talking about facts with real data and real-life experience.
How it started
My friend Jim Ryder, who I have known professionally for many years, was discussing with me some ideas he had for his new automotive aftermarket business. One thing lead to another and we started discussing the Godzilla engine, which was a good platform to develop parts for. Jim is a smart guy who has many years of experience working for Ford and Roush.
Jim is an engine expert.
We discussed parts, ideas, had some dinner and drinks. Then COVID hit. While much of the country was sheltering at home, Jim worked through his design concepts for new 7.3L engine products, and developed some great ideas ready for prototype manufacturing. He had visited several companies regarding prototyping and manufacturing services. Based on CWI’s scope of capabilities, he decided we would be the best overall choice to prototype, assist with testing, and ultimately manufacture parts for Indy Power Products We put our heads down and started making the first parts and started testing for his new company.
This is how I became familiar with the Godzilla engine platform.
Let’s talk about engines
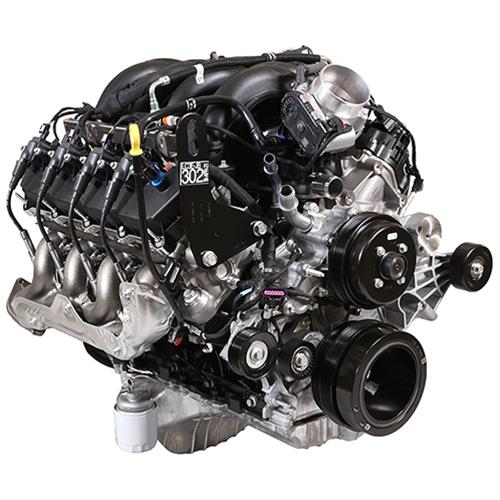
Now we have a 7.3L crate motor from Ford. Jim from Indy Power Products had designed some great ideas options for FED (Front Engine Dress), he identified oil pump issues for swaps, then he designed his own oil pump and about 20-30 other parts that needed to be machined.
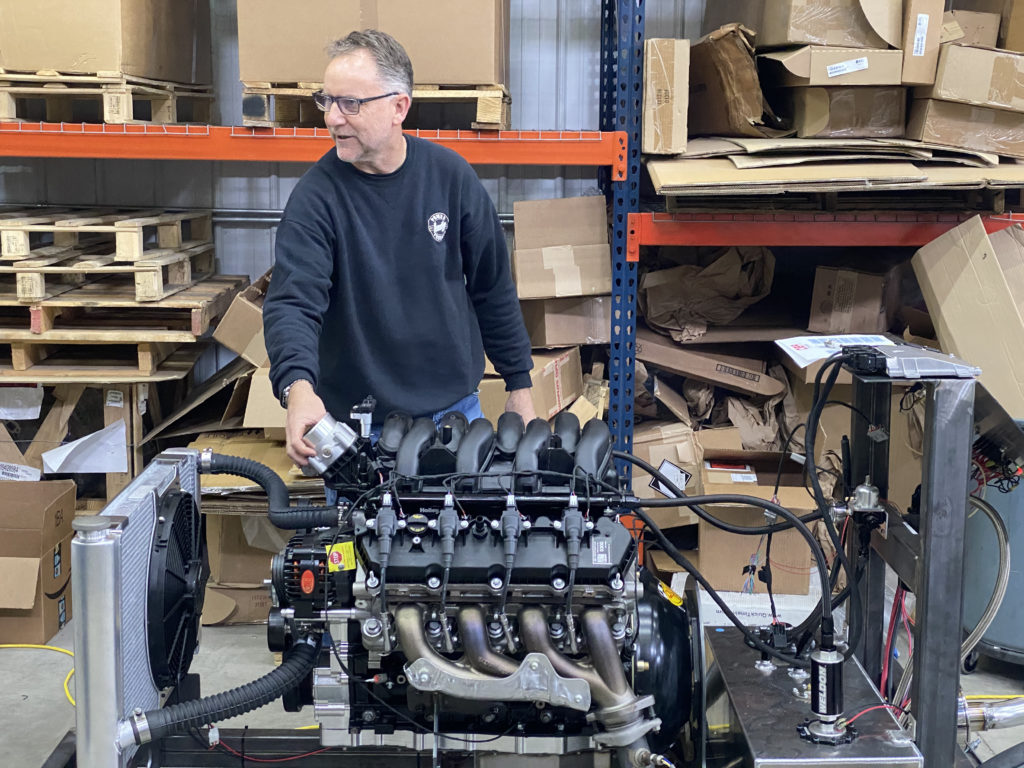
It was a natural fit for Jim to work with my machine shop to make parts. While he was cracking away with my team building parts, I started building an engine test stand so we could assemble test motors and run them since I don’t have an engine dyno. We were really looking for leaks and basic functions, so a dyno was not necessary yet.
Now we have parts, and engine and a test stand. Now what do we do to start this thing? Its time for an ECU and wiring.
Electronics and control systems
As of 06/02/2022 I have had engines running with several ECU’s. Any tuner that knows what they are doing should be able to get the engine running and tune it for your application with any common full featured ECU designed for a V8 Engine. The Engine has a 58x reductor wheel for crank trigger. You will need to add a coolant temp sensor depending on the control pack you use. We added ours to one of the heater hose bungs next to the upper radiator hose / thermostat housing.
Below are the details of each system we have ran. Do not over think the Godzilla, if you do a CAM swap anything LS will work if you lock out the VVT (Variable Valve Timing), use smart Coils and a different throttle body.
If you want to plug and play, use the VVT and features of the factory oil pump. The OBR system is the one that is integrated the best as a plug and play solution currently.
OBR–
This is a nice plug and play solution, it works with the OEM throttle body and is very simple to install.
EMtron-
For our application we are using a more sophisticated system to gather data and use it to engineer parts and for driving coaching.
We used the KV8 system in Foxzilla and work closely with our Tuner Sam Hiu Bin from Off The Line Performance. Our system is very complex because of our road racing application with a supercharger. The engine makes way more power than we need but we can control the power setting with a second throttle body that we use to control boost.
ECU Masters–
For fun we hooked one of these up with LS coils and a LS throttle body (Cable and drive by wire) since the EMU black is really designed for a 6 cylinder engine you have to run wasted spark, however this is an extremely easy ECU to use and is low cost and very powerful. We used some ECU master PMU units in some of our race cars their parts are a good value. Godzilla’s come with a harness, so it was not that bad to make it work. Note: ECU Masters is releasing a V8 version and that should work great. You will still need the smart coils and a throttle body other than the OEM Ford truck unit if you are doing drive by wire. You could use one off a coyote engine and it would work fine. The Ford truck has a different type of throttle body, new Ford uses SENT Single Edge Nibble Transmission, which is different than older Fords and GM applications. The OBR system works with this, we are working with EMtron to do the same.
Holley Dominator-
The second complete engine I built was for Nate Strunk for the “Godzilla Fairmont”. From data Nate used from us and some commonsense Jolt Systems fired his engine up with the Holly Dominator. The Dominator is the most common Drag Racing ECU and has many users and tuners. However other Holley systems should work fine if you have the VVT locked out and are ok having the oil pump run at 100%.
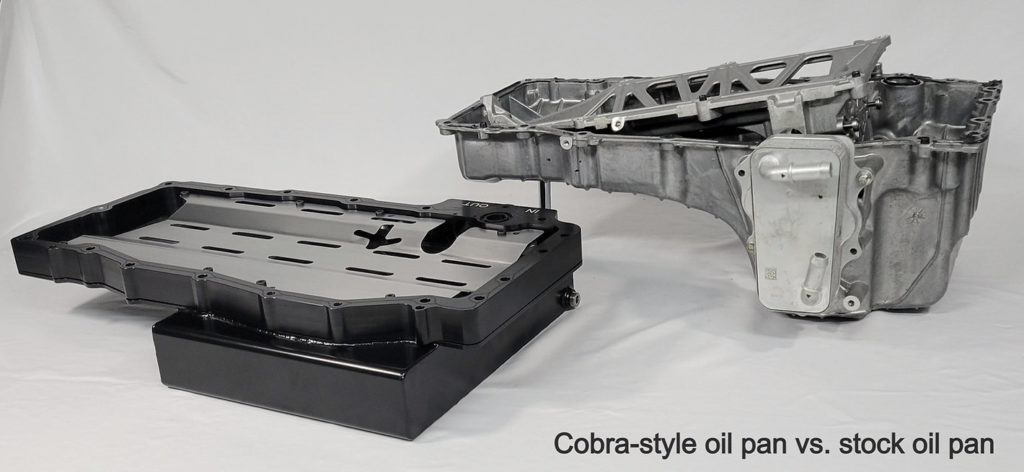
Oil Pans and Pumps
So out of the crate the Godzilla is a great pushrod engine. It has 7.3 liters, pushrod with roller hydraulic cam, variable valve timing and is reasonably priced. In typical Ford fashion it is designed for trucks and Ford’s engineering team only thought about trucks. The throttle body sticks up in the air, there is a massive Oil to water cooler on the side of the engine and the front drive is huge. So what I’m getting to is it will not drop into a Mustang as is.
The biggest issue is the oil pan and oil pump if you want to swap the engine into a car and keep the CG low. There are two solutions for this that I have installed, below are the details:
Indy Power Products
Since I was involved with this system from its original drawings and my team machines a primary portion of the components it was the obvious choice for us to use the products. To test this system, I built a car around it so we could do serious on track testing and capture data.
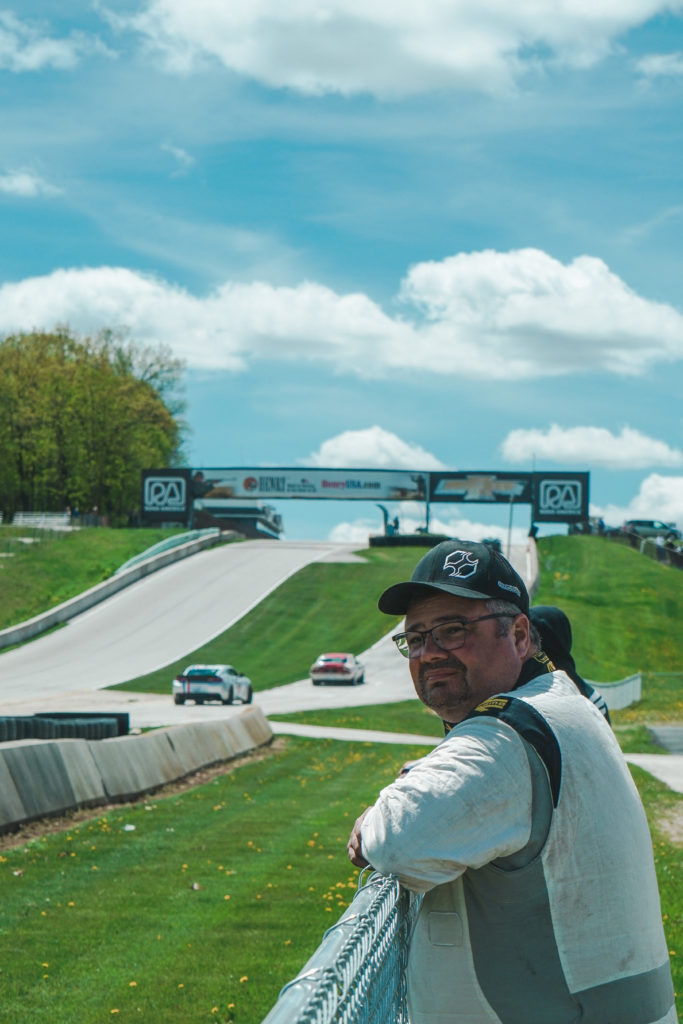
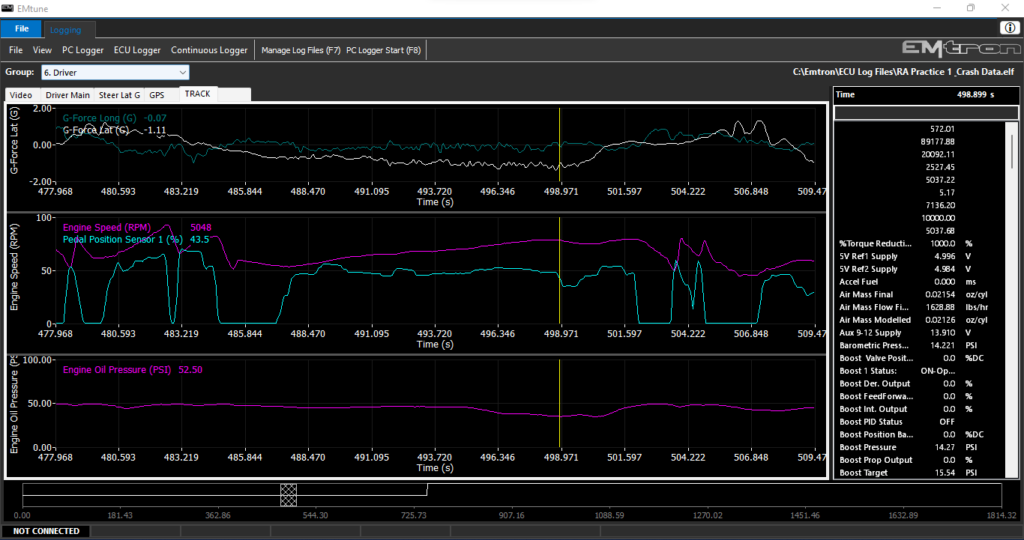
This is the only aftermarket system that has been used and tested extensively by seasoned engineers and has an oil pan selection for different applications, these pans have trap doors and are designed for spirited driving. We also have data from Road America in the notorious carousel that devours many oiling systems, the IPP system works flawlessly.
Below is the data from Road America, this data reflects the section through the carousel showing the oil pressure being consistently over 50psi with 10 seconds of 1 G of lateral force.
The system is semi simple, you remove the original pan, front cover, and oil pump, you will need to pull the damper and it would be best to have the engine on a stand, however I have removed and reinstalled this system with the engine installed in a car. The design intent was to allow for easy installation in swap applications. The oil pump is replaced by a new gerotor pump that is mounted in the front cover. This allows the customer choices for compact front drive kits with standard GM type II pumps, Alternators and Sanden style A/C compressors. It comes with a windage tray, and the stock dipstick can be recalibrated for use with the rear sump version.
I can tell you that the system works extremely well, all drive pulleys have good wrap and do not slip at up to 8,000 RPM’s
So this system is really a complete system with options for all standard engine dress and supercharger applications, Harrop, Pro Charger and Whipple. It is so low with the Cobra oil pan I was able to chop 1” off the lower flange of the Quicktime bellhousing to lower the engine even more in the car.
417 Motorsports
When I built the engine for Nate Strunk he had chosen the 417 oil pan and pump modification. This is a different approach to the same problem of swapping the Godzilla into cars.
It was very simple to install, 417 modifies the oil pump and pan has a nice billet rail machined, then they fabricate a rear sump oil pan around the modified pump pickup. It is a little over 2” shorter than the stock pan configuration. I think for street or drag use it would be a great option, there were no baffles in the pan, and it is a rear sump only.
FED (Front Engine Dress)
There are several options available, customers will need to either buy a solution with new front cover or modify the factory front cover.
The only complete systems I am aware of are kits from Indy Power Products.
Any fabricator could build their own system and if swapping in a truck you could use the OEM brackets and they would work fine.
Transmission selection
Contrary to popular belief on the internet anything Coyote will work with the Godzilla, we used a Quicktime bellhousing, Tilton twin disk clutch and Tremec T56 Magnum from Bowler transmissions. It has an 8 bolt crank and uses the Quicktime RM-8080 bellhousing.
I did have to modify the plate between the bellhousing and engine to clear the Tilton Slave cylinder / throw out bearing and the snout the throw out bearing rides on might need to be shortened depending on the clutch you use.
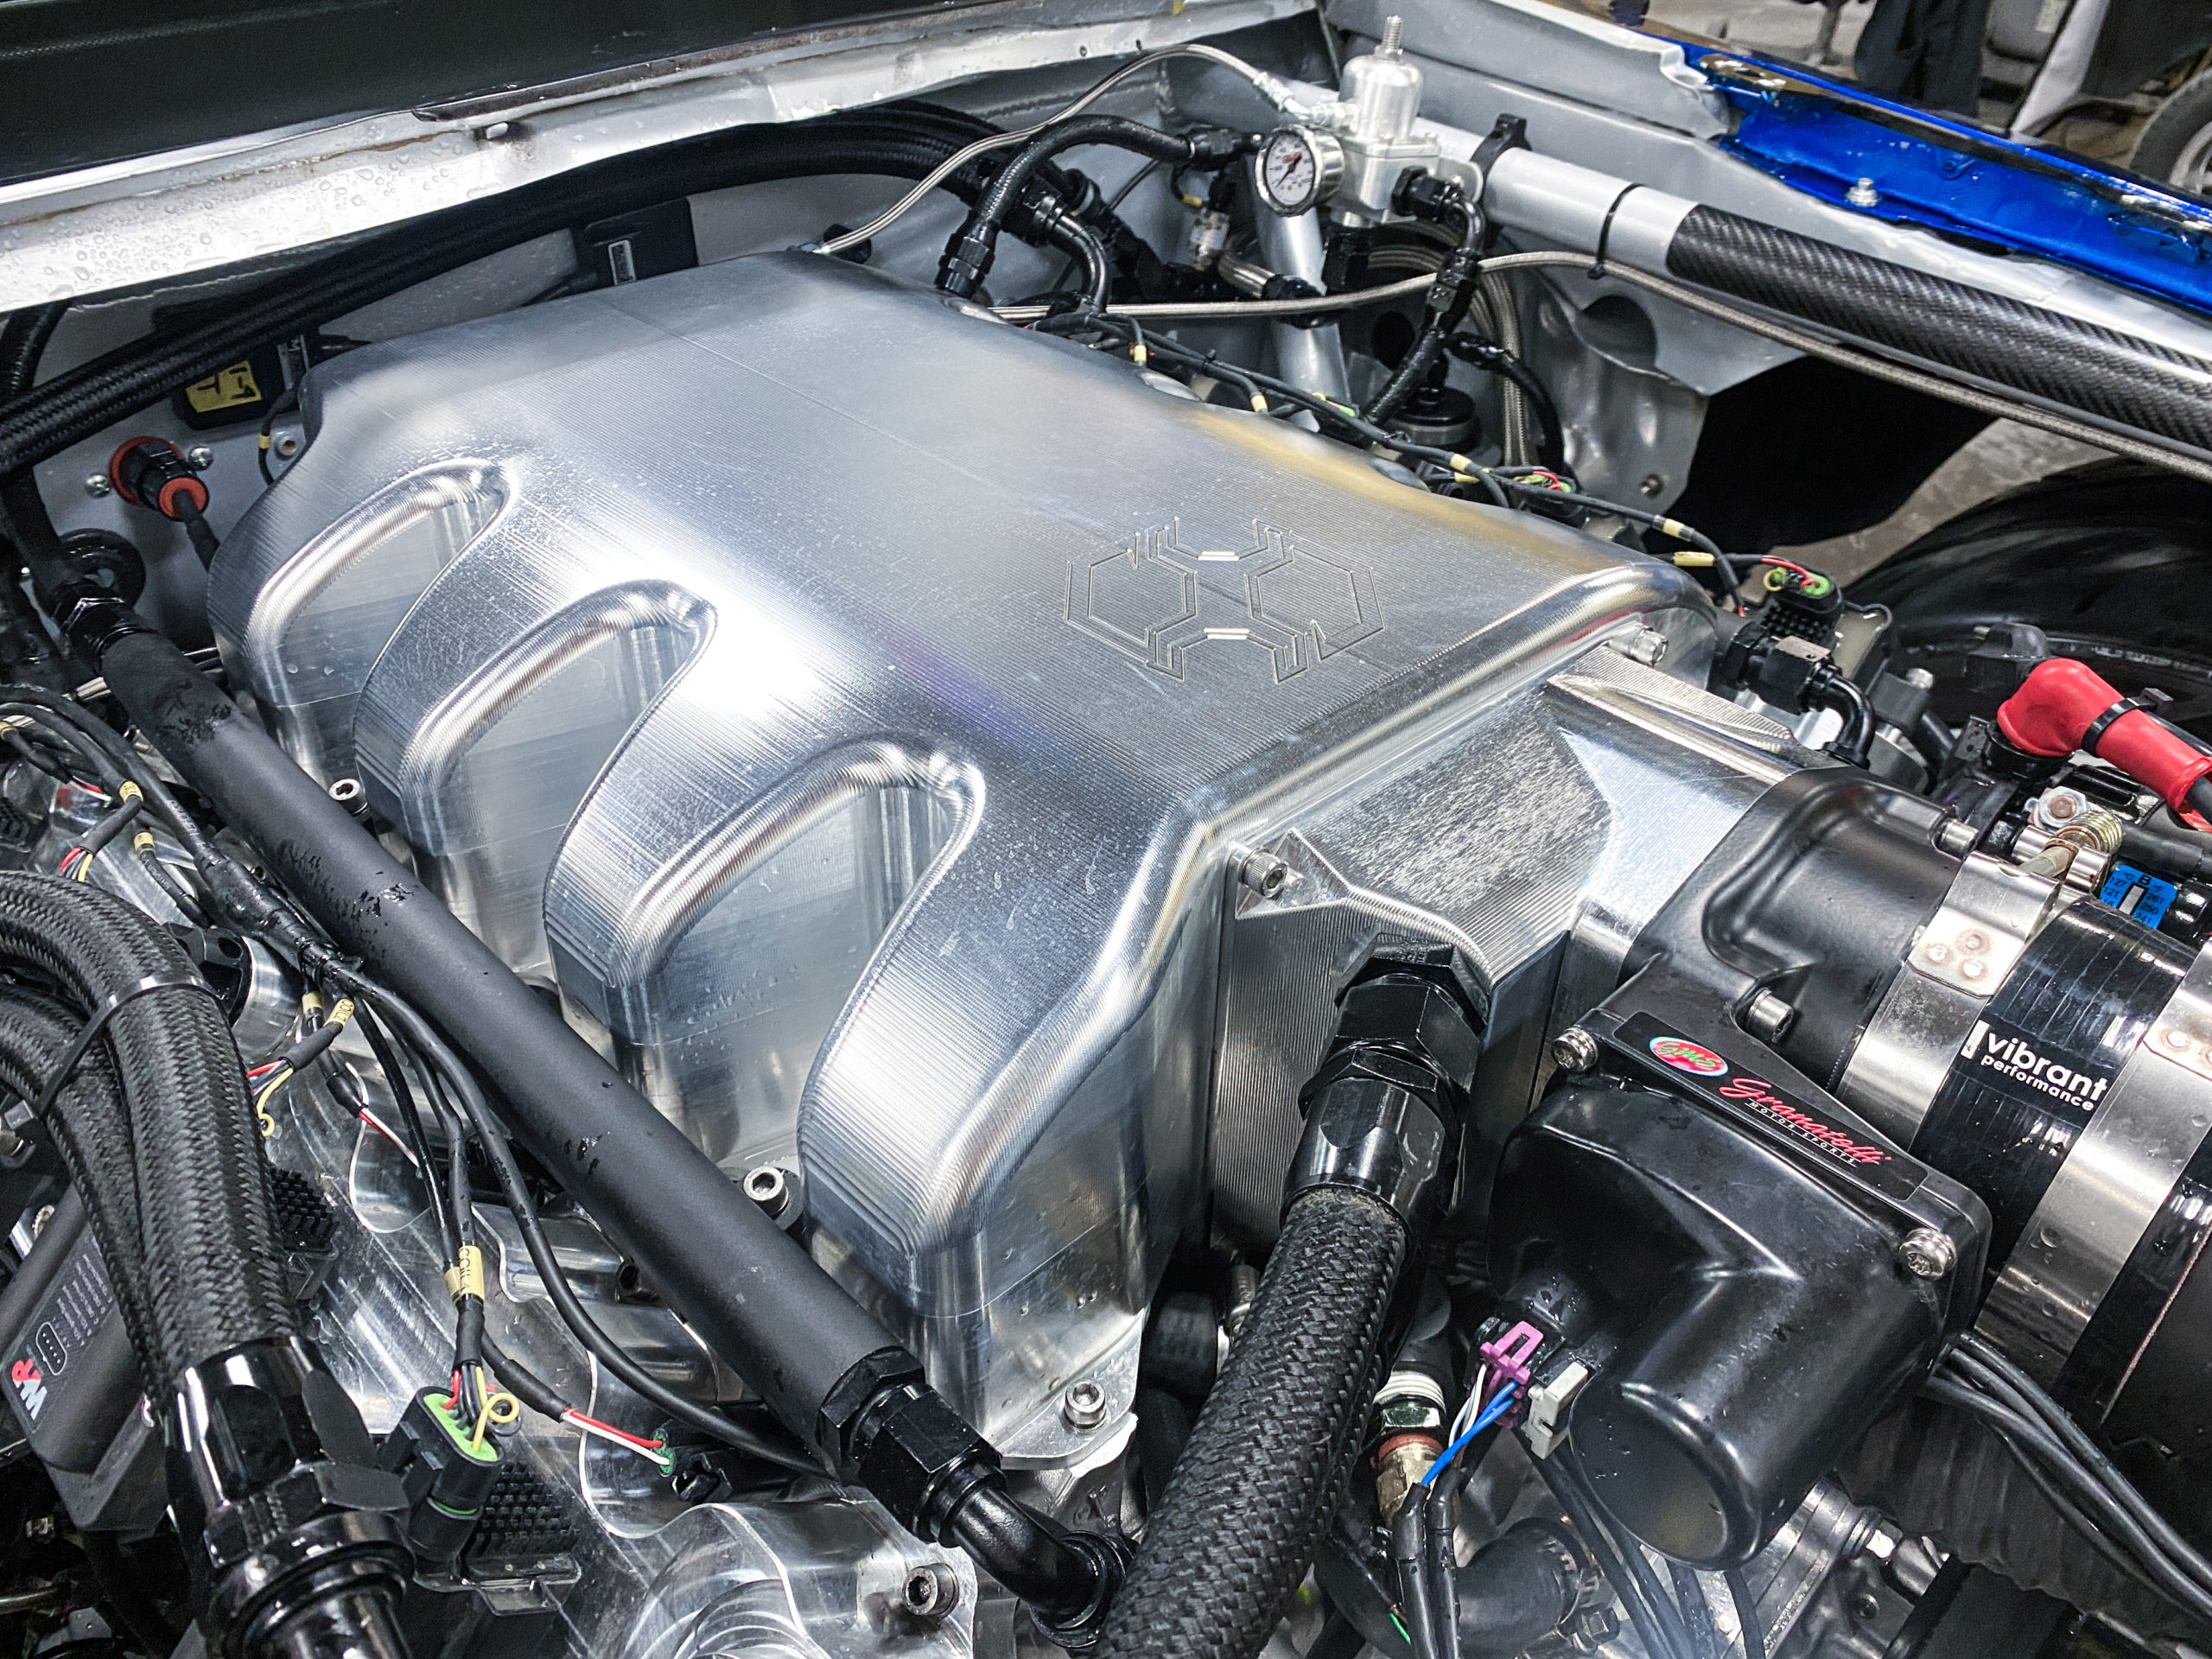
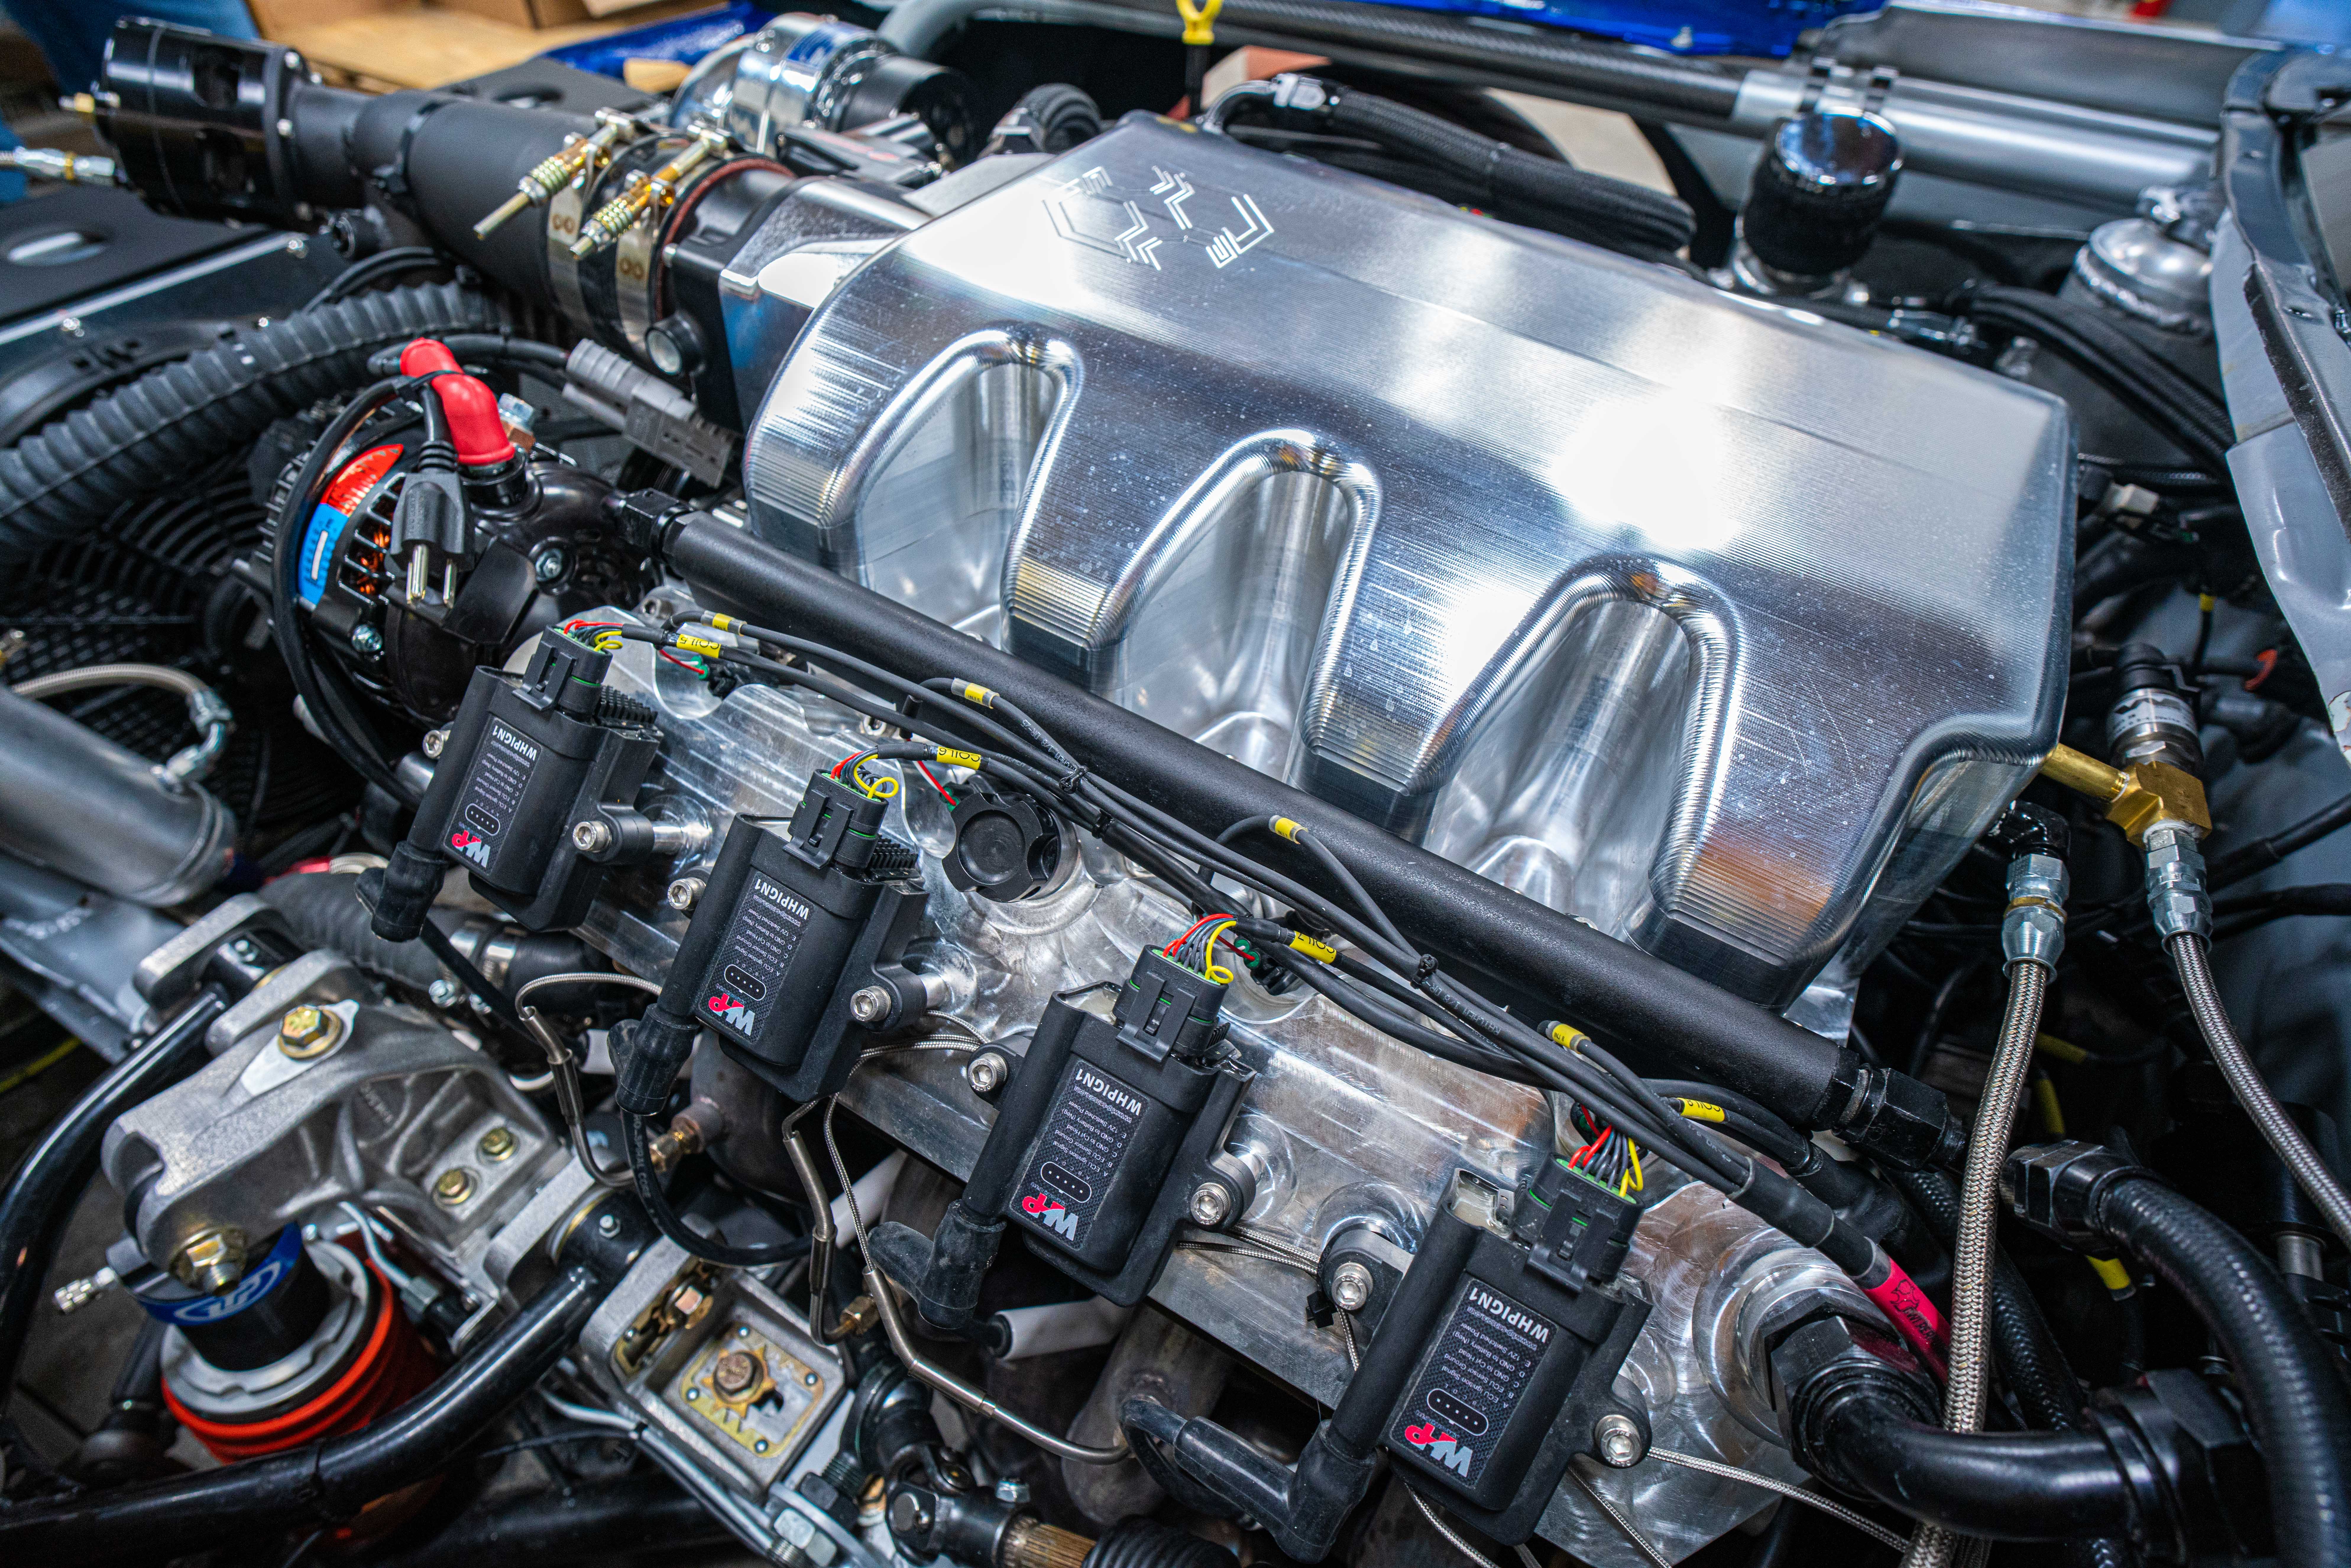
Intake manifolds
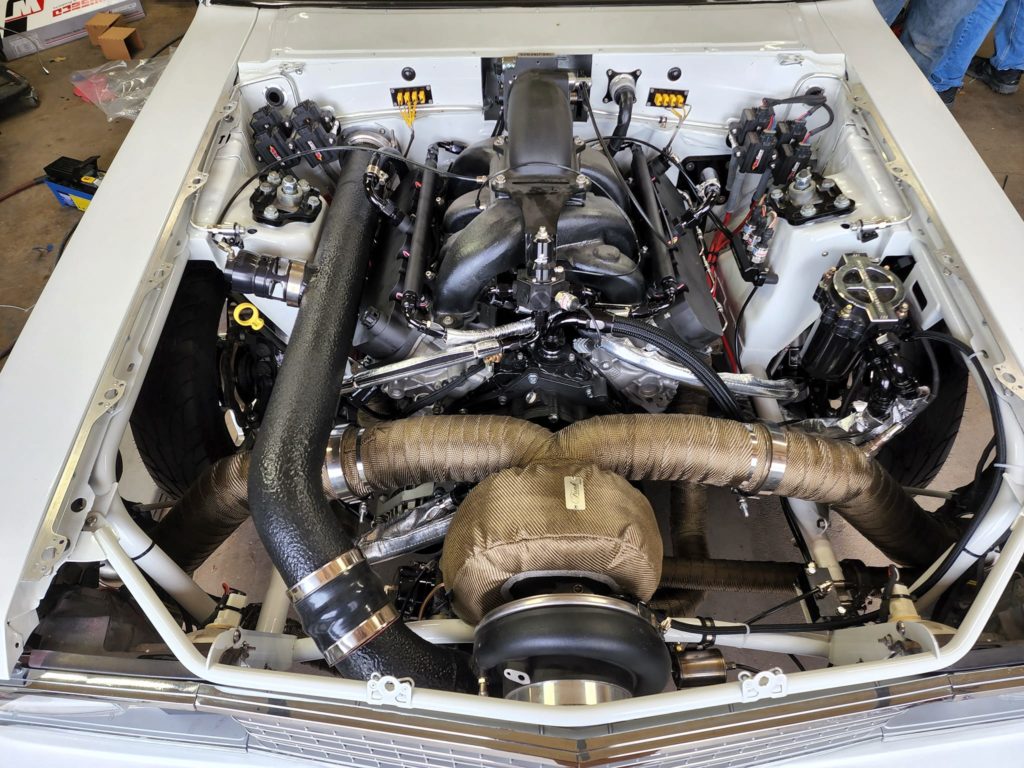
For our application I decided to build our own intercooled intake manifold so that the engine would fit under the stock hood for increased visibility while racing.
In our application I used a cooler that was designed for modified engines. VMP and PWR designed a thicker cooler with tighter fin density that offers extremely efficient cooling. There is a lot of data available for charge air coolers / intercooler bricks for different applications. I choose to keep things simple and use the Intercooler brick out of the current GT500 Mustang. Stock these engines make 750hp and the aftermarket has modified them for up to 1400hp. In my past life I was the Director of Electronics and Innovations at SPAL (the fan company) so I have tons of experience working with charge air coolers and cooling.
These coolers drop the IAT drastically -100 degrees or more, but they do it at about a 20% loss of boost with our F-1A-94 Pro Charger, these results will wildly vary between turbo and supercharger applications. Before you freak out about a 20% loss, remember that’s a number that changes through RPM range and will have different results with different methods of boost. It also follows nearly identical to GM’s engine data on the latest supercharged LT engines. The 7.3 engine is large displacement and we saw our boost levels go from 28 PSI out of the supercharger to about 22 PSI at the engine at 6200 rpm, we could certainly increase the boost on the charge end to get the desired result on the engine side. We also saw some big spikes in blower surge even with Pro Chargers Pro Valve. Not enough to throw the belt or break the blower but enough to get my attention when looking at data.
Some other things I found in testing, to get the throttle response feel we wanted I vented the engine side of intake into the charge pipe to allow instant boost into the engine with (2) 1” holes, this modification was all internal and not visible. What this did at low RPM is it slightly bypasses the intercooler to let air in and it also helped reduce the blower surge by equalizing the pressure slightly. This modification makes a huge difference on the driver feel of the engine and keeps from getting that big blower / turbo hit like riding a two stroke dirtbike. (2) 1” holes flow enough air for about 400 hp.
I was surprised that this modification had a very negligible difference on the IAT. Only changing it by 1 degree.
If I was drag racing, I would not do this modification because you can get your desired pressure by using two step or launch control. For our application we wanted to have instant throttle on feel for Autocrosss, Speed Stop and Road Course use.
An additional factor of our application is we are bleeding some boost at different power levels, I could be getting a false reading on the charge pipe side because my sensor is before the throttle body we are using to control boost. I do think our data is solid and good enough for a viable commercial product.
To summarize all this into plain English, the intake and Pro Charger makes lots of power, more power than most people will know how to use unless they have a drag car that is glued to the track. It makes too much power, and we choose to lower the power level except for the largest tracks. When we get some more experience with our test car and some aerodynamic improvements then we will be able to use the power. We have a super experience test driver to give us real feedback.
For any streetcar applications or truck towing it is plenty of power and the efficiency of the Air to Water cooler is a great option.
For our testing we have the Granatelli Motorsports 103mm marine throttle body.
Engine Combinations
Non boosted street application (typical Hot Rod application)
- I would use the stock engine, change the cam and lock out the VVT, Cam swapping this engine is easy, you will need to remove the rocker arms and pushrods, spin the engine over a few revolutions to push the lifters into the holders and then remove the dampener, front cover and then you can remove the timing chain and cam.
- You will need some special tools to do this. You will need a puller for the dampener, installation tool for the dampener, cam socket and a holder for the cam sprocket to torque the cam bolt, you should probably buy Willis’s engines solid cam bolt.
- You will also need all the torque spec’s and I would recommend getting the cam sprocket locked out by Willis Performance or Indy Power Products.
- These engines will produce 500-600 hp easy with this combination, Brian Wolfe has a bunch of this data published on his website.
- Don’t rev over 6200 RPM without changing the valve springs
- Engine Dress and oiling system is really dictated to the swap applications.
More Power
If you want to bump things up to a more aggressive cam and maybe boost or nitrous I would change the rods, pistons and heads for the applications. I have built three different combinations with some different parts and results were very similar..
Things that did not go well in testing
Foxzilla Engine 1
Component list:
Callies Rods, Weisco Pistons, balanced crankshaft, blueprinted bearing tolerances 10:1 pistons, Willis Stage 2 heads, Willis Stage 2 Cam, locked out VVT, Innovators West Damper, Procharger F-1A-94 supercharger, deleted piston squirters.
The car was running fine, making about 950 Hp on the dyno at the tires, we were adding timing and then in made a little ticking noise, we turned it off. We are testing an intake manifold design and shaking a brand new car out so it had about 20 hours on it
Engine had compression, cam was turning, but it seemed like the cam timing was off
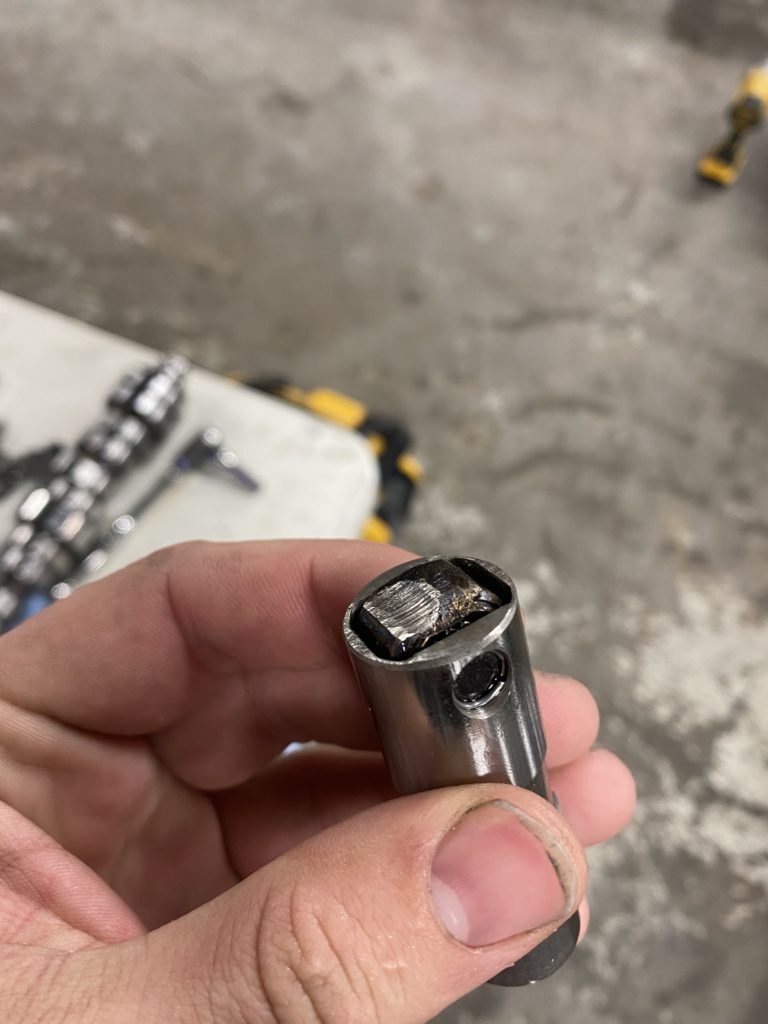
We had extra everything at my shop so we brought the car from Off the Line Performance home to check it out. Jim from Indy Power Products was here so he tore into it with my guys and they removed the front cover and inspected things, we noticed the cam sprocket had the timing alignment feature broken and the cam timing changed because the sprocket rotated on the cam face, we had beat on the motor very hard with two step and bouncing off the revlimiter, we also thought this might have been a weak point of the engine. Brian Wolfe had a similar issue but his broke the cam bolt. I was pissed because we were supposed to be going to Charlotte, NC to race the car the following day.
We reassemble with a new sprocket, checked cam timing, and reassembled the engine. (This is where a bunch of experienced guys made a big mistake and we should have removed and tore down the engine then) We then start the engine, it ran fine, then click, click, click stop, we failed another cam gear and this time bent all the intake valves.
No metal in the oil, no other signs of issues so we packed a backup car in the trailer and thought about it on the drive from Des Moines to Charlotte. Got in a crash with the truck and trailer, missed the race, something was wrong with our Karma. No one is hurt so we got back to Des Moines, and I stayed away from the car until I had a clean and clear head.
I disassembled the engine in the car, bottom end seemed fine, we killed valves which were backordered, found the lifter that failed that was adding the extra stress to the engine valve train, found a second lifter that was going to die soon, pulled the cam and then jumped in my plane and flew to Detroit to discuss with Brian Wolfe.
I am not an engine builder, my best friend Mike Six is, plus I own a machine shop. I understand how to machine and assemble stuff. So, we make a plan, I buy another set of heads from Brian Wolfe, a new cam, lifters, and rocker arms. I suck it up and lock myself in my shop. Then I do the typical engine builder super clean and inspect everything. I borescope the cam bores, have the pan off look for anything metal anywhere. It all looks good. I reassemble the engine and the same thing happens with the new cam, heads and lifters.
Now I am disappointed and don’t get what’s wrong, I almost cried in frustration after all the new parts failed. I took the engine out and then did a detailed analysis of every part, bearing, ring, nut and bolt. I found the cam bearing oil passage was blocked with parts of a lifter, this is really what caused the sprockets to break. You could not see in this passage with the borescope and I just kept doing the same thing over and over. The cam did spin freely even with the screwed-up bearing but with increased load and it adds enough friction to break the sprocket.
Final synopsis- this engine ran well until we killed a lifter and had another one start to fail. It also failed the cam and cam bearing on the dyno with about 20 hours on it.
Foxzilla Engine 2
Since I had a spare engine, I went ahead and reassembled everything with new bearings, new block and checked every part in detail.
Same thing but with Willis’s stage 1 heads, stock valves and heads are CNC ported with softened combustion chamber.
I did not delete the piston squirters on this engine, on my first oil change I found 6 of them in the oil, I deleted them. If you’re changing the rods and pistons, I recommend deleting them, even if they clear the pistons or rod bolts.
Engine is still running just fine with no issues. We have good data from Road America on the Indy Power Products oiling system and our intake manifold.
Nate Strunk Engine
- Its more or less the same as Foxzilla engine 2, it has Molnar Rods vs Calies, heads that he purchased from Apocalypse performance vs Willis, it has more compression than the Foxzilla 2 engine but the same pistons.
- Like the other engine, I left the squirters and they had .030-.050 clearance and Nates engine broke them too.
- Nates Motor made 1133hp, 1259tq on 30lbs
Summary
- So overall the Godzilla engine is an animal, I am currently building a N/A version of this engine for the Foxzilla with Visner Engine Development (Heads), Brian Wolfe from Willis Performance Engines, Casey Wegner from Wegner Automotive and Jim Ryder from Indy Power Products.
- Goal is a higher reving engine with solid roller valvetrain and a little more displacement. Probably 12.5-13.5:1 trying to get 850 ish hp with 650-700 ft lbs on 100 octane and rev to 8,000 rpm.
- Drysump oiling system with updated Cam sprocket and timing chain / belt (have not made that decision yet.
- To make it a killer easy to maintain N/A or boosted engine is very straight forward. The engine will have teething pains and that is expected.
Without the help of Jim Ryder, Brian Wolfe, Dave Visner, Mike Six, Arron Linn, Sam Hui Bin and my team we would not be able to work on these projects. Billy Johnson helped me develop a monster car to test this engine.
I am very blessed to have a great wife that understands development crunches and am fortunate to be able to put my son Preston in fast safe cars as Billy and him test these products.
Thank you for taking the time to read about the Godzilla engine.